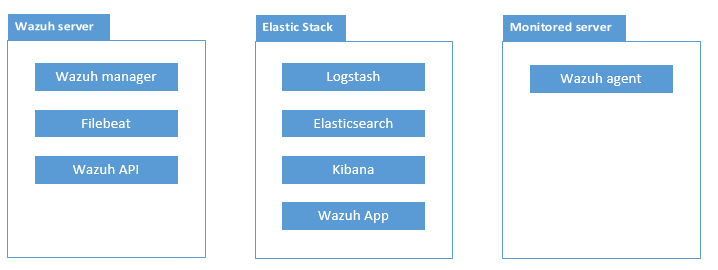
WAZUH架构图 分布式
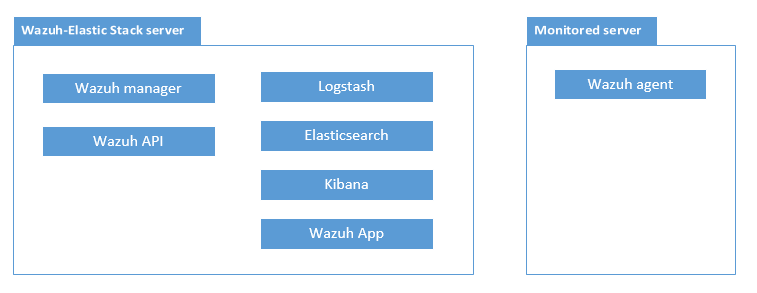
单台部署
Install Wazuh server 添加CentOS wazuh源 1 2 3 4 5 6 7 8 9 $ cat > /etc/yum.repos.d/wazuh.repo <<\EOF [wazuh_repo] gpgcheck=1 gpgkey=https://packages.wazuh.com/key/GPG-KEY-WAZUH enabled=1 name=CentOS-$releasever - Wazuh baseurl=https://packages.wazuh.com/yum/el/$releasever/$basearch protect=1 EOF
安装Wazuh-manager 1 $ yum install wazuh-manager
查看Wazuh运行状态1 2 3 4 5 6 7 8 9 [root@localhost init.d]# service wazuh-manager status ossec-monitord is running... ossec-logcollector is running... ossec-remoted is running... ossec-syscheckd is running... ossec-analysisd is running... ossec-maild not running... ossec-execd is running... wazuh-modulesd is running...
安装Wazuh API
[root@localhost opt]# curl –silent –location https://rpm.nodesource.com/setup_6.x | bash -
1 2 3 4 5 6 7 8 9 10 11 12 13 14 15 16 17 18 19 20 21 22 23 24 25 26 27 28 29 30 31 32 ## Installing the NodeSource Node.js 6.x repo... ## Inspecting system... + rpm -q --whatprovides redhat-release || rpm -q --whatprovides centos-release || rpm -q --whatprovides cloudlinux-release || rpm -q --whatprovides sl-release + uname -m ## Confirming "el6-x86_64" is supported... + curl -sLf -o /dev/null 'https://rpm.nodesource.com/pub_6.x/el/6/x86_64/nodesource-release-el6-1.noarch.rpm' ## Downloading release setup RPM... + mktemp + curl -sL -o '/tmp/tmp.l3Z6OzvS3W' 'https://rpm.nodesource.com/pub_6.x/el/6/x86_64/nodesource-release-el6-1.noarch.rpm' ## Installing release setup RPM... + rpm -i --nosignature --force '/tmp/tmp.l3Z6OzvS3W' ## Cleaning up... + rm -f '/tmp/tmp.l3Z6OzvS3W' ## Checking for existing installations... + rpm -qa 'node|npm' | grep -v nodesource ## Run `yum install -y nodejs` (as root) to install Node.js 6.x and npm. ## You may also need development tools to build native addons: ## `yum install -y gcc-c++ make`
[root@localhost opt]# ls
[root@localhost opt]# yum install nodejs
1 2 3 4 5 6 7 8 9 10 11 12 13 14 15 16 17 18 19 20 21 22 23 24 25 26 27 28 29 30 31 32 33 34 35 36 37 38 39 40 41 42 43 44 45 46 47 48 49 已加载插件:fastestmirror 设置安装进程 Loading mirror speeds from cached hostfile * base: mirrors.aliyun.com * extras: mirrors.aliyun.com * updates: mirrors.aliyun.com nodesource | 2.5 kB 00:00 nodesource/primary_db | 43 kB 00:00 解决依赖关系 --> 执行事务检查 ---> Package nodejs.x86_64 2:6.11.1-1nodesource.el6 will be 安装 --> 完成依赖关系计算 依赖关系解决 ========================================================================================================================================================== 软件包 架构 版本 仓库 大小 ========================================================================================================================================================== 正在安装: nodejs x86_64 2:6.11.1-1nodesource.el6 nodesource 9.5 M 事务概要 ========================================================================================================================================================== Install 1 Package(s) 总下载量:9.5 M Installed size: 33 M 确定吗?[y/N]:y 下载软件包: nodejs-6.11.1-1nodesource.el6.x86_64.rpm | 9.5 MB 00:20 warning: rpmts_HdrFromFdno: Header V4 RSA/SHA1 Signature, key ID 34fa74dd: NOKEY Retrieving key from file:///etc/pki/rpm-gpg/NODESOURCE-GPG-SIGNING-KEY-EL Importing GPG key 0x34FA74DD: Userid : NodeSource <[email protected] > Package: nodesource-release-el6-1.noarch (installed) From : /etc/pki/rpm-gpg/NODESOURCE-GPG-SIGNING-KEY-EL 确定吗?[y/N]:y 运行 rpm_check_debug 执行事务测试 事务测试成功 执行事务 Warning: RPMDB altered outside of yum. 正在安装 : 2:nodejs-6.11.1-1nodesource.el6.x86_64 1/1 Verifying : 2:nodejs-6.11.1-1nodesource.el6.x86_64 1/1 已安装: nodejs.x86_64 2:6.11.1-1nodesource.el6 完毕!
[root@localhost opt]# yum install wazuh-api
1 2 3 4 5 6 7 8 9 10 11 12 13 14 15 16 17 18 19 20 21 22 23 24 25 26 27 28 29 30 31 32 33 34 35 36 37 38 39 40 41 42 43 44 45 46 47 已加载插件:fastestmirror 设置安装进程 Loading mirror speeds from cached hostfile * base: mirrors.aliyun.com * extras: mirrors.aliyun.com * updates: mirrors.aliyun.com 解决依赖关系 --> 执行事务检查 ---> Package wazuh-api.x86_64 0:2.0.1-1.el6 will be 安装 --> 完成依赖关系计算 依赖关系解决 ========================================================================================================================================================== 软件包 架构 版本 仓库 大小 ========================================================================================================================================================== 正在安装: wazuh-api x86_64 2.0.1-1.el6 wazuh_repo 2.0 M 事务概要 ========================================================================================================================================================== Install 1 Package(s) 总下载量:2.0 M Installed size: 7.8 M 确定吗?[y/N]:y 下载软件包: wazuh-api-2.0.1-1.el6.x86_64.rpm | 2.0 MB 00:04 运行 rpm_check_debug 执行事务测试 事务测试成功 执行事务 正在安装 : wazuh-api-2.0.1-1.el6.x86_64 1/1 Installing for SysVinit WAZUH-API is not running. WAZUH-API started. Don't forget to run the configuration script after installation: /var/ossec/api/scripts/configure_api.sh Warning: Minimal supported version is 2.7 root 21160 5.0 0.2 614120 7952 pts/0 Rl+ 15:12 0:00 /usr/bin/node /var/ossec/api/app.js WAZUH-API stopped. WAZUH-API started. Verifying : wazuh-api-2.0.1-1.el6.x86_64 1/1 已安装: wazuh-api.x86_64 0:2.0.1-1.el6 完毕!
1 2 3 4 5 6 7 [root@localhost Python-2.7.3]# service wazuh-api status WAZUH-API is stopped. Last 20 log entries: WazuhAPI 2017-08-01 15:12:23: ERROR: No suitable Python version found. This application requires Python 2.7 or newer. Exiting. Full log: /var/ossec/logs/api.log
1 2 $ yum install -y centos-release-scl $ yum install -y python27
1 2 3 4 [root@localhost Python-2.7.3]# service wazuh-api start WAZUH-API started. [root@localhost Python-2.7.3]# service wazuh-api status WAZUH-API is running.
安装 Filebeat 1 2 3 4 5 6 7 8 9 10 11 [root@localhost opt]# rpm --import https://packages.elastic.co/GPG-KEY-elasticsearch [root@localhost opt]# cat > /etc/yum.repos.d/elastic.repo << EOF > [elastic-5.x] > name=Elastic repository for 5.x packages > baseurl=https://artifacts.elastic.co/packages/5.x/yum > gpgcheck=1 > gpgkey=https://artifacts.elastic.co/GPG-KEY-elasticsearch > enabled=1 > autorefresh=1 > type=rpm-md > EOF
[root@localhost opt]# yum install filebeat
1 2 3 4 5 6 7 8 9 10 11 12 13 14 15 16 17 18 19 20 21 22 23 24 25 26 27 28 29 30 31 32 33 34 35 36 37 38 39 40 41 42 已加载插件:fastestmirror 设置安装进程 Loading mirror speeds from cached hostfile * base: mirrors.aliyun.com * extras: mirrors.aliyun.com * updates: mirrors.aliyun.com elastic-5.x | 1.3 kB 00:00 elastic-5.x/primary | 81 kB 00:00 elastic-5.x 206/206 解决依赖关系 --> 执行事务检查 ---> Package filebeat.x86_64 0:5.5.1-1 will be 安装 --> 完成依赖关系计算 依赖关系解决 ========================================================================================================================================================== 软件包 架构 版本 仓库 大小 ========================================================================================================================================================== 正在安装: filebeat x86_64 5.5.1-1 elastic-5.x 8.7 M 事务概要 ========================================================================================================================================================== Install 1 Package(s) 总下载量:8.7 M Installed size: 29 M 确定吗?[y/N]:y 下载软件包: filebeat-5.5.1-x86_64.rpm | 8.7 MB 06:35 运行 rpm_check_debug 执行事务测试 事务测试成功 执行事务 正在安装 : filebeat-5.5.1-1.x86_64 1/1 Verifying : filebeat-5.5.1-1.x86_64 1/1 已安装: filebeat.x86_64 0:5.5.1-1 完毕!
1 2 3 4 5 6 7 8 9 10 11 12 13 14 15 16 17 18 19 20 21 22 23 24 25 26 [root@localhost opt]# curl -so /etc/filebeat/filebeat.yml https://raw.githubusercontent.com/wazuh/wazuh/2.0/extensions/filebeat/filebeat.yml [root@localhost opt]# ls /etc/file filebeat/ filesystems [root@localhost opt]# ls /etc/filebeat/filebeat. filebeat.full.yml filebeat.template-es2x.json filebeat.template-es6x.json filebeat.template.json filebeat.yml [root@localhost opt]# ls /etc/filebeat/filebeat. filebeat.full.yml filebeat.template-es2x.json filebeat.template-es6x.json filebeat.template.json filebeat.yml [root@localhost opt]# ls /etc/filebeat/filebeat.yml /etc/filebeat/filebeat.yml [root@localhost opt]# cat /etc/filebeat/filebeat.yml filebeat: prospectors: - input_type: log paths: - "/var/ossec/logs/alerts/alerts.json" document_type: json json.message_key: log json.keys_under_root: true json.overwrite_keys: true output: logstash: # The Logstash hosts hosts: ["YOUR_ELASTIC_SERVER_IP:5000"] # ssl: # certificate_authorities: ["/etc/filebeat/logstash.crt"]
[root@localhost opt]# vi /etc/filebeat/filebeat.yml
1 2 3 4 5 6 7 8 9 10 11 12 13 14 15 16 filebeat: prospectors: - input_type: log paths: - "/var/ossec/logs/alerts/alerts.json" document_type: json json.message_key: log json.keys_under_root: true json.overwrite_keys: true output: logstash: # The Logstash hosts hosts: ["192.168.1.43:5000"] # ssl: # certificate_authorities: ["/etc/filebeat/logstash.crt"]
1 2 3 4 5 6 7 8 9 10 11 12 [root@localhost opt]# chkconfig --add filebeat [root@localhost opt]# service filebeat start Starting filebeat: 2017/08/01 10:06:00.996092 beat.go:285: INFO Home path: [/usr/share/filebeat] Config path: [/etc/filebeat] Data path: [/var/lib/filebeat] Logs path: [/var/log/filebeat] 2017/08/01 10:06:00.996210 beat.go:186: INFO Setup Beat: filebeat; Version: 5.5.1 2017/08/01 10:06:00.996254 metrics.go:23: INFO Metrics logging every 30s 2017/08/01 10:06:00.996500 logstash.go:90: INFO Max Retries set to: 3 2017/08/01 10:06:00.996763 outputs.go:108: INFO Activated logstash as output plugin. 2017/08/01 10:06:00.997506 publish.go:295: INFO Publisher name: localhost.localdomain 2017/08/01 10:06:01.008432 async.go:63: INFO Flush Interval set to: 1s 2017/08/01 10:06:01.008471 async.go:64: INFO Max Bulk Size set to: 2048 Config OK [确定]
Install Elastic Stack 安装 Java JRE (Logstash和Elasticsearch必要的依赖) 1 2 3 4 5 6 7 8 9 10 11 12 13 14 15 16 17 18 19 20 21 22 23 24 25 26 27 28 29 30 31 32 33 34 35 36 37 38 39 40 41 42 43 44 45 46 47 48 49 50 51 52 53 54 55 56 57 58 59 60 61 62 63 64 65 66 67 68 69 70 71 72 73 74 75 76 77 [root@localhost ~]# cd /opt/ [root@localhost opt]# ls [root@localhost opt]# curl -Lo jre-8-linux-x64.rpm --header "Cookie: oraclelicense=accept-securebackup-cookie" "http://download.oracle.com/otn-pub/java/jdk/8u144-b01/090f390dda5b47b9b721c7dfaa008135/jre-8u144-linux-x64.rpm" % Total % Received % Xferd Average Speed Time Time Time Current Dload Upload Total Spent Left Speed 100 56.4M 100 56.4M 0 0 20.1M 0 0:00:02 0:00:02 --:--:-- 23.3M [root@localhost opt]# ll 总用量 57832 -rw-r--r--. 1 root root 59219102 8月 22 14:45 jre-8-linux-x64.rpm [root@localhost opt]# rpm -qlp jre-8-linux-x64.rpm > /dev/null 2>&1 && echo "Java package downloaded successfully" || echo "Java package did not download successfully" Java package downloaded successfully [root@localhost opt]# yum install jre-8-linux-x64.rpm 已加载插件:fastestmirror 设置安装进程 诊断 jre-8-linux-x64.rpm: jre1.8.0_144-1.8.0_144-fcs.x86_64 jre-8-linux-x64.rpm 将被安装 base | 3.7 kB 00:00 base/primary_db | 4.7 MB 00:00 extras | 3.4 kB 00:00 extras/primary_db | 29 kB 00:01 updates | 3.4 kB 00:00 updates/primary_db | 2.5 MB 00:05 解决依赖关系 --> 执行事务检查 ---> Package jre1.8.0_144.x86_64 0:1.8.0_144-fcs will be 安装 --> 完成依赖关系计算 依赖关系解决 ================================================================================================================================================ 软件包 架构 版本 仓库 大小 ================================================================================================================================================ 正在安装: jre1.8.0_144 x86_64 1.8.0_144-fcs /jre-8-linux-x64 133 M 事务概要 ================================================================================================================================================ Install 1 Package(s) 总文件大小:133 M Installed size: 133 M 确定吗?[y/N]:y 下载软件包: 运行 rpm_check_debug 执行事务测试 事务测试成功 执行事务 正在安装 : jre1.8.0_144-1.8.0_144-fcs.x86_64 1/1 Unpacking JAR files... plugin.jar... javaws.jar... deploy.jar... rt.jar... jsse.jar... charsets.jar... localedata.jar... Verifying : jre1.8.0_144-1.8.0_144-fcs.x86_64 1/1 已安装: jre1.8.0_144.x86_64 0:1.8.0_144-fcs 完毕! [root@localhost opt]# rm jre-8-linux-x64.rpm rm:是否删除普通文件 "jre-8-linux-x64.rpm"?y [root@localhost opt]# ls [root@localhost opt]# rpm --import https://packages.elastic.co/GPG-KEY-elasticsearch [root@localhost opt]# ls [root@localhost opt]# cat > /etc/yum.repos.d/elastic.repo << EOF > [elastic-5.x] > name=Elastic repository for 5.x packages > baseurl=https://artifacts.elastic.co/packages/5.x/yum > gpgcheck=1 > gpgkey=https://artifacts.elastic.co/GPG-KEY-elasticsearch > enabled=1 > autorefresh=1 > type=rpm-md > EOF
安装elasticsearch 1 2 3 4 5 6 7 8 9 10 11 12 13 14 15 16 17 18 19 20 21 22 23 24 25 26 27 28 29 30 31 32 33 34 35 36 37 38 39 40 41 42 43 44 45 46 47 48 49 50 51 52 53 54 55 56 57 58 59 60 61 62 63 64 [root@localhost opt]# yum install elasticsearch 已加载插件:fastestmirror 设置安装进程 Determining fastest mirrors * base: mirrors.btte.net * extras: mirrors.tuna.tsinghua.edu.cn * updates: mirror.bit.edu.cn elastic-5.x | 1.3 kB 00:00 elastic-5.x/primary | 86 kB 00:00 elastic-5.x 218/218 解决依赖关系 --> 执行事务检查 ---> Package elasticsearch.noarch 0:5.5.2-1 will be 安装 --> 完成依赖关系计算 依赖关系解决 ================================================================================================================================================ 软件包 架构 版本 仓库 大小 ================================================================================================================================================ 正在安装: elasticsearch noarch 5.5.2-1 elastic-5.x 32 M 事务概要 ================================================================================================================================================ Install 1 Package(s) 总下载量:32 M Installed size: 36 M 确定吗?[y/N]:y 下载软件包: elasticsearch-5.5.2.rpm | 32 MB 09:03 运行 rpm_check_debug 执行事务测试 事务测试成功 执行事务 Creating elasticsearch group... OK Creating elasticsearch user... OK 正在安装 : elasticsearch-5.5.2-1.noarch 1/1 ### NOT starting on installation, please execute the following statements to configure elasticsearch service to start automatically using chkconfig sudo chkconfig --add elasticsearch ### You can start elasticsearch service by executing sudo service elasticsearch start Verifying : elasticsearch-5.5.2-1.noarch 1/1 已安装: elasticsearch.noarch 0:5.5.2-1 完毕! [root@localhost opt]# chkconfig --add elasticsearch [root@localhost opt]# service elasticsearch start 正在启动 elasticsearch: [确定] [root@localhost opt]# curl https://raw.githubusercontent.com/wazuh/wazuh-kibana-app/master/server/startup/integration_files/template_file.json | curl -XPUT 'http://localhost:9200/_template/wazuh' -H 'Content-Type: application/json' -d @- % Total % Received % Xferd Average Speed Time Time Time Current Dload Upload Total Spent Left Speed 100 15547 100 15547 0 0 16125 0 --:--:-- --:--:-- --:--:-- 40592 {"acknowledged":true}[root@localhost opt]# ls [root@localhost opt]# ls [root@localhost opt]# curl https://raw.githubusercontent.com/wazuh/wazuh-kibana-app/master/server/startup/integration_files/alert_sample.json | curl -XPUT "http://localhost:9200/wazuh-alerts-"`date +%Y.%m.%d`"/wazuh/sample" -H 'Content-Type: application/json' -d @- % Total % Received % Xferd Average Speed Time Time Time Current Dload Upload Total Spent Left Speed 102 1432 102 1432 0 0 1567 0 --:--:-- --:--:-- --:--:-- 4937 {"_index":"wazuh-alerts-2017.08.22","_type":"wazuh","_id":"sample","_version":1,"result":"created","_shards":{"total":2,"successful":1,"failed":0},"created":true}[root@localhost opt]# [root@localhost opt]#
It is recommended to edit the default configuration to improve the Elasticsearch performance. To do so, please see Elasticsearch tuning.https://documentation.wazuh.com/current/installation-guide/optional-configurations/elastic-tuning.html#elastic-tuning
安装Logstash
Logstash is the tool that will collect, parse, and forward to Elasticsearch for indexing and storage all logs generated by Wazuh server. For more info please see Logstash.https://www.elastic.co/products/logstash
1 2 3 4 5 6 7 8 9 10 11 12 13 14 15 16 17 18 19 20 21 22 23 24 25 26 27 28 29 30 31 32 33 34 35 36 37 38 39 40 41 42 43 44 45 46 47 48 49 50 51 52 53 54 55 56 57 58 59 [root@localhost opt]# yum install logstash 已加载插件:fastestmirror 设置安装进程 Loading mirror speeds from cached hostfile * base: mirrors.btte.net * extras: mirrors.tuna.tsinghua.edu.cn * updates: mirror.bit.edu.cn 解决依赖关系 --> 执行事务检查 ---> Package logstash.noarch 1:5.5.2-1 will be 安装 --> 完成依赖关系计算 依赖关系解决 ================================================================================================================================================ 软件包 架构 版本 仓库 大小 ================================================================================================================================================ 正在安装: logstash noarch 1:5.5.2-1 elastic-5.x 90 M 事务概要 ================================================================================================================================================ Install 1 Package(s) 总下载量:90 M Installed size: 169 M 确定吗?[y/N]:y 下载软件包: logstash-5.5.2.rpm | 90 MB 33:26 运行 rpm_check_debug 执行事务测试 事务测试成功 执行事务 正在安装 : 1:logstash-5.5.2-1.noarch 1/1 Using provided startup.options file: /etc/logstash/startup.options Successfully created system startup script for Logstash Verifying : 1:logstash-5.5.2-1.noarch 1/1 已安装: logstash.noarch 1:5.5.2-1 完毕! [root@localhost opt]# curl -so /etc/logstash/conf.d/01-wazuh.conf https://raw.githubusercontent.com/wazuh/wazuh/2.0/extensions/logstash/01-wazuh.conf [root@localhost opt]# curl -so /etc/logstash/wazuh-elastic5-template.json https://raw.githubusercontent.com/wazuh/wazuh/2.0/extensions/elasticsearch/wazuh-elastic5-template.json [root@localhost opt]# /usr/share/logstash/bin/system-install Successfully created system startup script for Logstash [root@localhost opt]# chkconfig --add logstash 在 logstash 服务中读取信息时出错:没有那个文件或目录 [root@localhost opt]# ls /etc/init.d/ auditd functions iptables killall netconsole postfix rsyslog single crond halt jexec mdmonitor netfs rdisc sandbox sshd elasticsearch ip6tables kdump messagebus network restorecond saslauthd udev-post [root@localhost opt]# /usr/share/logstash/bin/system-install /etc/logstash/startup.options sysv Using provided startup.options file: /etc/logstash/startup.options Manually creating startup for specified platform: sysv Successfully created system startup script for Logstash [root@localhost opt]# chkconfig --add logstash [root@localhost opt]# service logstash start logstash started
Setting up SSL for Filebeat and Logstash
因为Wazuh server和Elastic Stack server是分布式架构,要配置在Filebeat和Logstash之间配SSL加密。
1 [root@localhost opt]# cp /etc/pki/tls/openssl.cnf custom_openssl.cnf
vi custom_openssl.cnf1 2 [ v3_ca ] subjectAltName = IP: 192.168.106.43
1 2 3 4 5 6 7 8 [root@localhost opt]# openssl req -x509 -batch -nodes -days 3650 -newkey rsa:2048 -keyout /etc/logstash/logstash.key -out /etc/logstash/logstash.crt -config custom_openssl.cnf Generating a 2048 bit RSA private key .................+++ .....+++ writing new private key to '/etc/logstash/logstash.key' ----- [root@localhost opt]# rm custom_openssl.cnf rm:是否删除普通文件 "custom_openssl.cnf"?y
配置Logstash server,这时在服务器中应该有了/etc/logstash/logstash.crt 证书和 /etc/logstash/logstash.key秘钥。
1 2 3 4 5 6 7 8 9 10 11 12 13 14 15 16 17 18 19 20 21 22 vi /etc/logstash/conf.d/01-wazuh.conf 把 input { beats { port => 5000 codec => "json_lines" # ssl => true # ssl_certificate => "/etc/logstash/logstash.crt" # ssl_key => "/etc/logstash/logstash.key" } } 改成 input { beats { port => 5000 codec => "json_lines" ssl => true ssl_certificate => "/etc/logstash/logstash.crt" ssl_key => "/etc/logstash/logstash.key" } }
1 2 3 重启logstash [root@localhost opt]# service logstash restart logstash started
配置Filebeat
现在我们配置filebeat认证logstash服务器认证。
1 2 3 4 5 6 7 8 9 10 11 12 13 14 15 16 17 18 19 20 21 22 23 24 25 26 27 28 29 30 31 32 33 34 35 36 37 38 39 40 41 42 43 44 45 46 47 48 49 50 51 52 53 54 55 56 57 58 59 60 61 62 63 64 65 66 67 68 69 70 71 72 73 74 75 [root@localhost ~]# yum -y install openssh-clients 已加载插件:fastestmirror 设置安装进程 Loading mirror speeds from cached hostfile * base: mirrors.aliyun.com * extras: mirrors.aliyun.com * updates: mirrors.aliyun.com 解决依赖关系 --> 执行事务检查 ---> Package openssh-clients.x86_64 0:5.3p1-122.el6 will be 安装 --> 处理依赖关系 openssh = 5.3p1-122.el6,它被软件包 openssh-clients-5.3p1-122.el6.x86_64 需要 --> 处理依赖关系 libedit.so.0()(64bit),它被软件包 openssh-clients-5.3p1-122.el6.x86_64 需要 --> 执行事务检查 ---> Package libedit.x86_64 0:2.11-4.20080712cvs.1.el6 will be 安装 ---> Package openssh.x86_64 0:5.3p1-111.el6 will be 升级 --> 处理依赖关系 openssh = 5.3p1-111.el6,它被软件包 openssh-server-5.3p1-111.el6.x86_64 需要 ---> Package openssh.x86_64 0:5.3p1-122.el6 will be an update --> 执行事务检查 ---> Package openssh-server.x86_64 0:5.3p1-111.el6 will be 升级 ---> Package openssh-server.x86_64 0:5.3p1-122.el6 will be an update --> 完成依赖关系计算 依赖关系解决 ================================================================================================================================================ 软件包 架构 版本 仓库 大小 ================================================================================================================================================ 正在安装: openssh-clients x86_64 5.3p1-122.el6 base 443 k 为依赖而安装: libedit x86_64 2.11-4.20080712cvs.1.el6 base 74 k 为依赖而更新: openssh x86_64 5.3p1-122.el6 base 277 k openssh-server x86_64 5.3p1-122.el6 base 329 k 事务概要 ================================================================================================================================================ Install 2 Package(s) Upgrade 2 Package(s) 总下载量:1.1 M 下载软件包: (1/4): libedit-2.11-4.20080712cvs.1.el6.x86_64.rpm | 74 kB 00:00 (2/4): openssh-5.3p1-122.el6.x86_64.rpm | 277 kB 00:00 (3/4): openssh-clients-5.3p1-122.el6.x86_64.rpm | 443 kB 00:00 (4/4): openssh-server-5.3p1-122.el6.x86_64.rpm | 329 kB 00:00 ------------------------------------------------------------------------------------------------------------------------------------------------ 总计 414 kB/s | 1.1 MB 00:02 运行 rpm_check_debug 执行事务测试 事务测试成功 执行事务 正在升级 : openssh-5.3p1-122.el6.x86_64 1/6 正在安装 : libedit-2.11-4.20080712cvs.1.el6.x86_64 2/6 正在安装 : openssh-clients-5.3p1-122.el6.x86_64 3/6 正在升级 : openssh-server-5.3p1-122.el6.x86_64 4/6 清理 : openssh-server-5.3p1-111.el6.x86_64 5/6 清理 : openssh-5.3p1-111.el6.x86_64 6/6 Verifying : openssh-server-5.3p1-122.el6.x86_64 1/6 Verifying : libedit-2.11-4.20080712cvs.1.el6.x86_64 2/6 Verifying : openssh-5.3p1-122.el6.x86_64 3/6 Verifying : openssh-clients-5.3p1-122.el6.x86_64 4/6 Verifying : openssh-5.3p1-111.el6.x86_64 5/6 Verifying : openssh-server-5.3p1-111.el6.x86_64 6/6 已安装: openssh-clients.x86_64 0:5.3p1-122.el6 作为依赖被安装: libedit.x86_64 0:2.11-4.20080712cvs.1.el6 作为依赖被升级: openssh.x86_64 0:5.3p1-122.el6 openssh-server.x86_64 0:5.3p1-122.el6 完毕!
以下内容在filebeat服务端,也就是wazuh server上执行。
vi /etc/filebeat/filebeat.yml1 2 3 4 5 6 7 8 9 10 11 12 13 14 修改 output: logstash: # The Logstash hosts hosts: ["192.168.106.43:5000"] # ssl: # certificate_authorities: ["/etc/filebeat/logstash.crt"] 变成 output: logstash: hosts: ["192.168.106.43:5000"] ssl: certificate_authorities: ["/etc/filebeat/logstash.crt"]
重新启动filebeat
1 2 3 4 5 6 7 8 9 10 11 12 13 14 15 16 17 18 19 20 21 [root@localhost ~]# service filebeat restart 2017/08/23 03:36:41.485699 beat.go:285: INFO Home path: [/usr/share/filebeat] Config path: [/etc/filebeat] Data path: [/var/lib/filebeat] Logs path: [/var/log/filebeat] 2017/08/23 03:36:41.485822 beat.go:186: INFO Setup Beat: filebeat; Version: 5.5.1 2017/08/23 03:36:41.485956 metrics.go:23: INFO Metrics logging every 30s 2017/08/23 03:36:41.488062 logstash.go:90: INFO Max Retries set to: 3 2017/08/23 03:36:41.488281 outputs.go:108: INFO Activated logstash as output plugin. 2017/08/23 03:36:41.489904 publish.go:295: INFO Publisher name: localhost.localdomain 2017/08/23 03:36:41.508442 async.go:63: INFO Flush Interval set to: 1s 2017/08/23 03:36:41.508504 async.go:64: INFO Max Bulk Size set to: 2048 Config OK Stopping filebeat: [确定] Starting filebeat: 2017/08/23 03:36:41.654868 beat.go:285: INFO Home path: [/usr/share/filebeat] Config path: [/etc/filebeat] Data path: [/var/lib/filebeat] Logs path: [/var/log/filebeat] 2017/08/23 03:36:41.654971 beat.go:186: INFO Setup Beat: filebeat; Version: 5.5.1 2017/08/23 03:36:41.655207 metrics.go:23: INFO Metrics logging every 30s 2017/08/23 03:36:41.656127 logstash.go:90: INFO Max Retries set to: 3 2017/08/23 03:36:41.656311 outputs.go:108: INFO Activated logstash as output plugin. 2017/08/23 03:36:41.656522 publish.go:295: INFO Publisher name: localhost.localdomain 2017/08/23 03:36:41.657083 async.go:63: INFO Flush Interval set to: 1s 2017/08/23 03:36:41.657125 async.go:64: INFO Max Bulk Size set to: 2048 Config OK [确定]
安装Kibana 1 2 3 4 5 6 7 8 9 10 11 12 13 14 15 16 17 18 19 20 21 22 23 24 25 26 27 28 29 30 31 32 33 34 35 36 37 38 39 40 41 42 43 44 45 46 47 48 49 [root@localhost opt]# yum install kibana 已加载插件:fastestmirror 设置安装进程 Loading mirror speeds from cached hostfile * base: mirror.bit.edu.cn * extras: mirror.bit.edu.cn * updates: mirror.bit.edu.cn 解决依赖关系 --> 执行事务检查 ---> Package kibana.x86_64 0:5.5.2-1 will be 安装 --> 完成依赖关系计算 依赖关系解决 ================================================================================================================================================ 软件包 架构 版本 仓库 大小 ================================================================================================================================================ 正在安装: kibana x86_64 5.5.2-1 elastic-5.x 50 M 事务概要 ================================================================================================================================================ Install 1 Package(s) 总下载量:50 M Installed size: 191 M 确定吗?[y/N]:y 下载软件包: kibana-5.5.2-x86_64.rpm | 50 MB 16:47 运行 rpm_check_debug 执行事务测试 事务测试成功 执行事务 正在安装 : kibana-5.5.2-1.x86_64 1/1 Verifying : kibana-5.5.2-1.x86_64 1/1 已安装: kibana.x86_64 0:5.5.2-1 完毕! [root@localhost opt]# /usr/share/kibana/bin/kibana-plugin install https://packages.wazuh.com/wazuhapp/wazuhapp.zip Attempting to transfer from https://packages.wazuh.com/wazuhapp/wazuhapp.zip Transferring 24560704 bytes.................... Transfer complete Retrieving metadata from plugin archive Extracting plugin archive Extraction complete Optimizing and caching browser bundles... Plugin installation complete
vi /etc/kibana/kibana.yml1 2 3 4 5 把 #server.host: "localhost" 改成 server.host: "0.0.0.0"
It is recommended to set up an Nginx proxy for Kibana in order to use SSL encryption and to enable authentication. Instructions to set the proxy up can be found at Setting up SSL and authentication for Kibana.https://documentation.wazuh.com/current/installation-guide/optional-configurations/kibana_ssl.html#kibana-ssl
重启kibana1 2 3 [root@localhost opt]# chkconfig --add kibana [root@localhost opt]# service kibana start kibana started
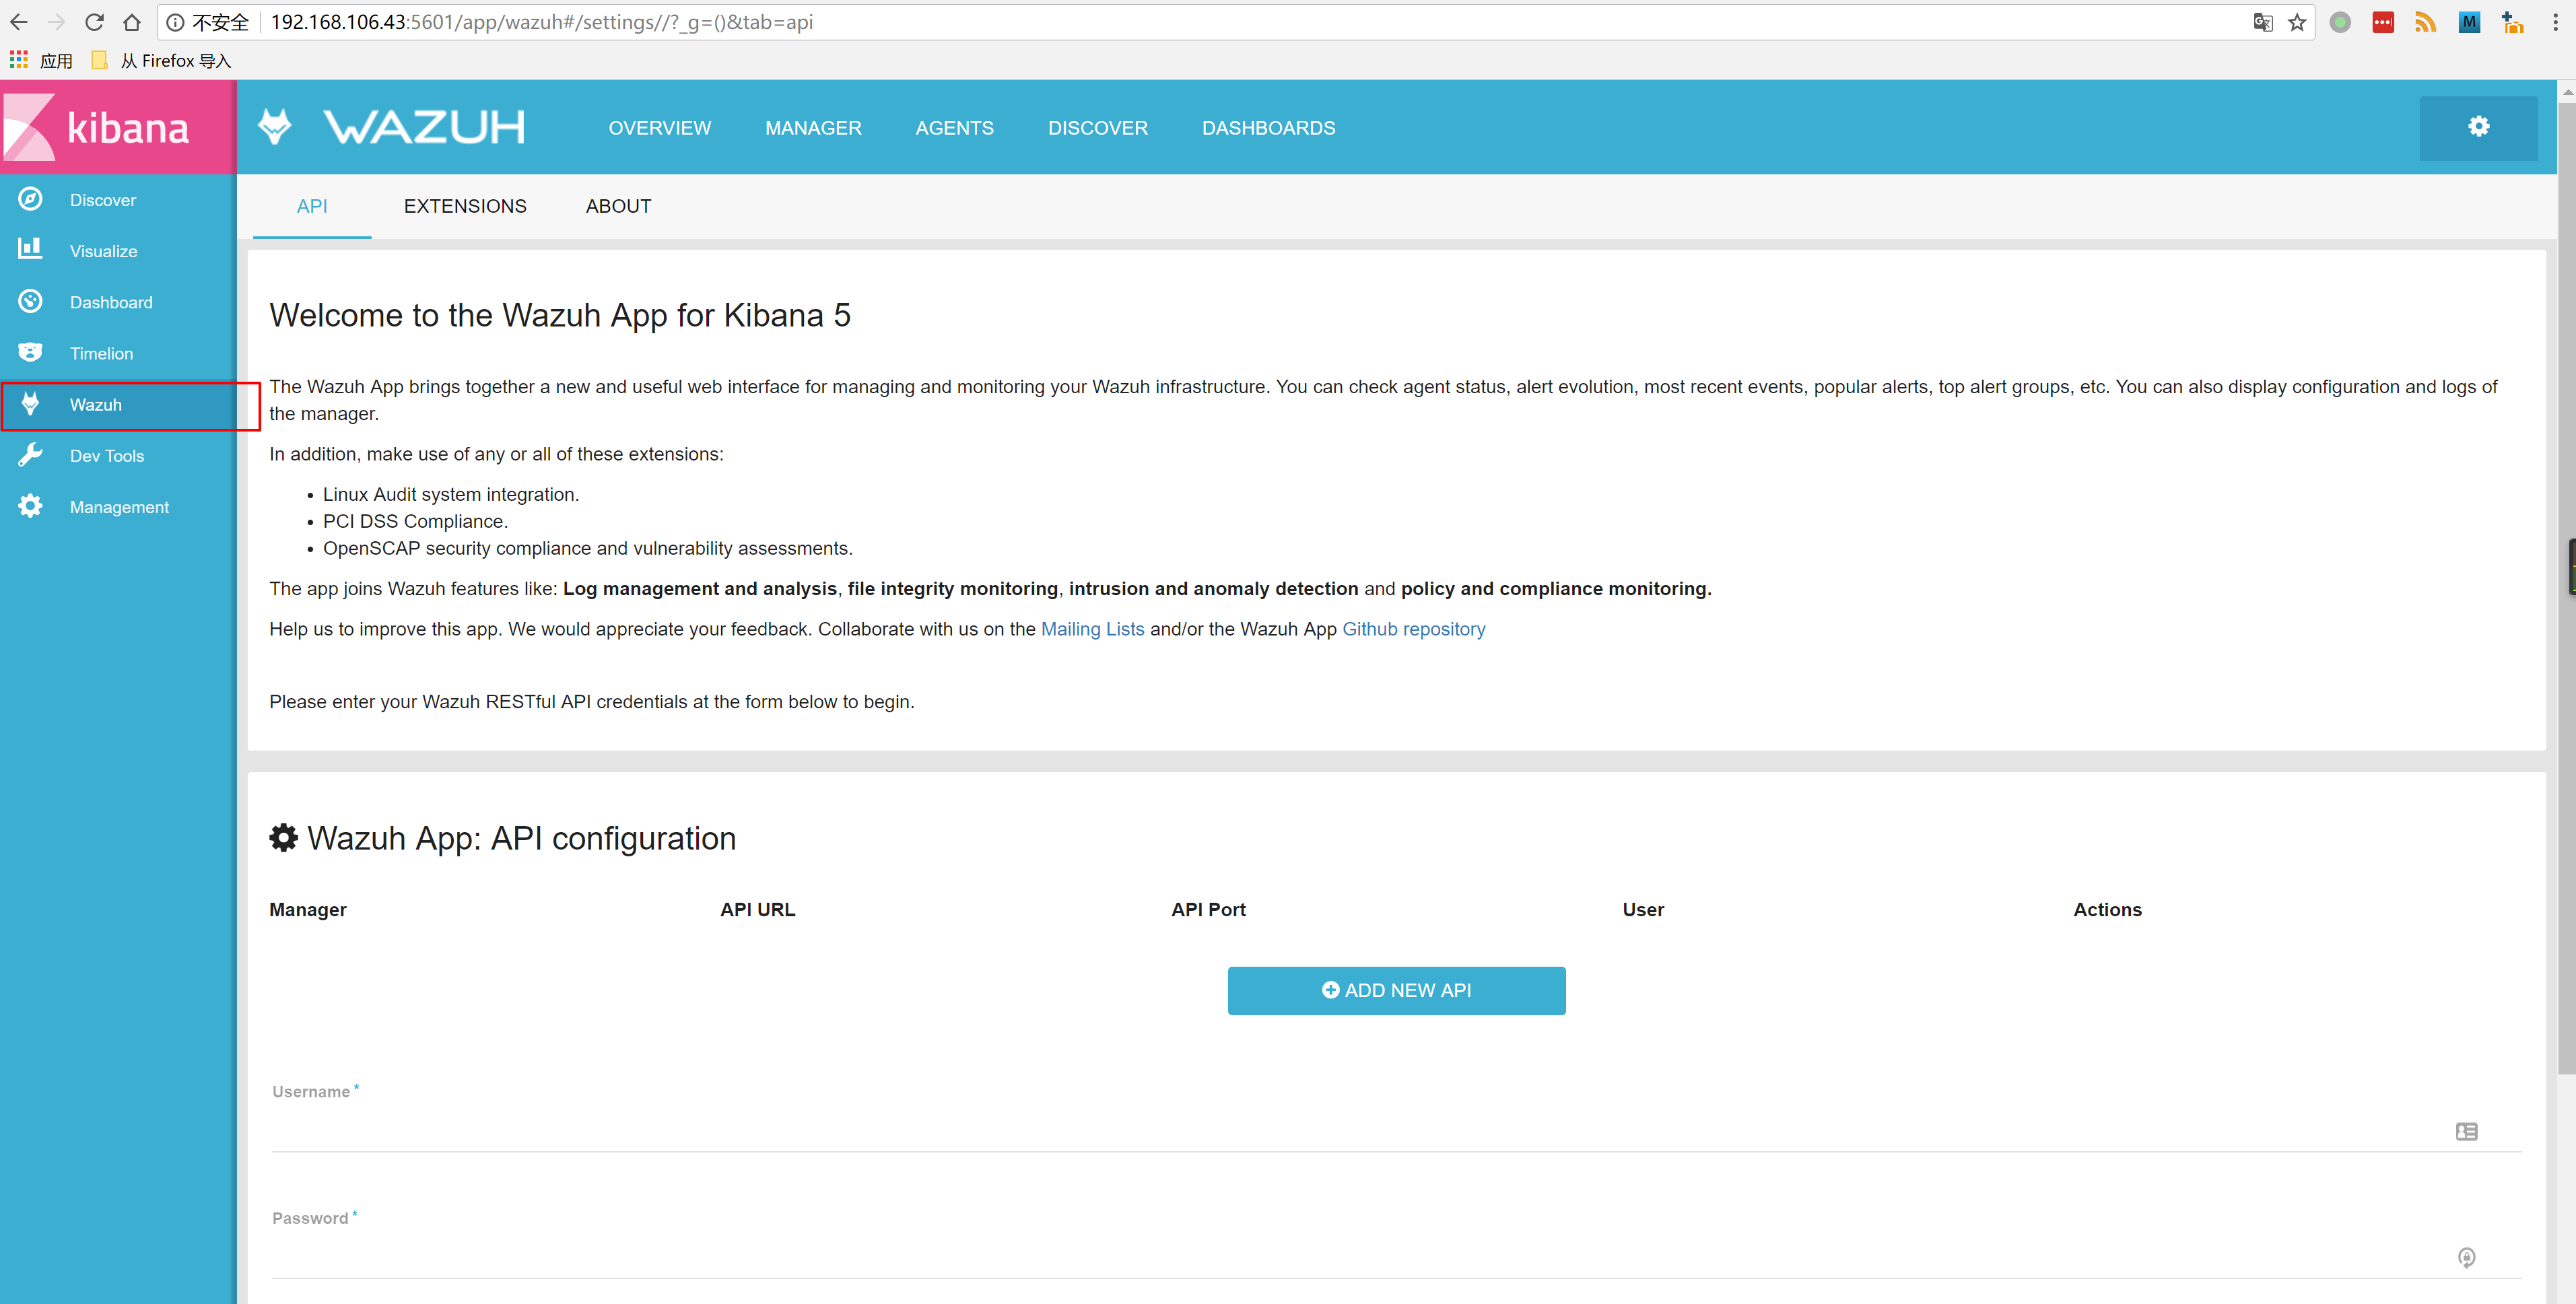
通过API连接Wazuh App 通过192.168.106.43:5601访问 Kibana,无法访问,查看本地端口已经监听在0.0.0.0:5601,所以关闭防火墙。
1 2 3 4 5 6 7 8 9 10 11 12 13 14 15 16 17 18 19 20 21 22 23 24 25 26 27 28 29 30 31 [root@localhost opt]# netstat -ntlp Active Internet connections (only servers) Proto Recv-Q Send-Q Local Address Foreign Address State PID/Program name tcp 0 0 0.0.0.0:5601 0.0.0.0:* LISTEN 27473/node tcp 0 0 0.0.0.0:22 0.0.0.0:* LISTEN 27360/sshd tcp 0 0 127.0.0.1:25 0.0.0.0:* LISTEN 5748/master tcp 0 0 ::ffff:127.0.0.1:9200 :::* LISTEN 26585/java tcp 0 0 ::1:9200 :::* LISTEN 26585/java tcp 0 0 ::ffff:127.0.0.1:9300 :::* LISTEN 26585/java tcp 0 0 ::1:9300 :::* LISTEN 26585/java tcp 0 0 :::22 :::* LISTEN 27360/sshd tcp 0 0 ::1:25 :::* LISTEN 5748/master [root@localhost opt]# iptables -L Chain INPUT (policy ACCEPT) target prot opt source destination ACCEPT all -- anywhere anywhere state RELATED,ESTABLISHED ACCEPT icmp -- anywhere anywhere ACCEPT all -- anywhere anywhere ACCEPT tcp -- anywhere anywhere state NEW tcp dpt:ssh REJECT all -- anywhere anywhere reject-with icmp-host-prohibited Chain FORWARD (policy ACCEPT) target prot opt source destination REJECT all -- anywhere anywhere reject-with icmp-host-prohibited Chain OUTPUT (policy ACCEPT) target prot opt source destination [root@localhost opt]# service iptables stop iptables:将链设置为政策 ACCEPT:filter [确定] iptables:清除防火墙规则: [确定] iptables:正在卸载模块: [确定]
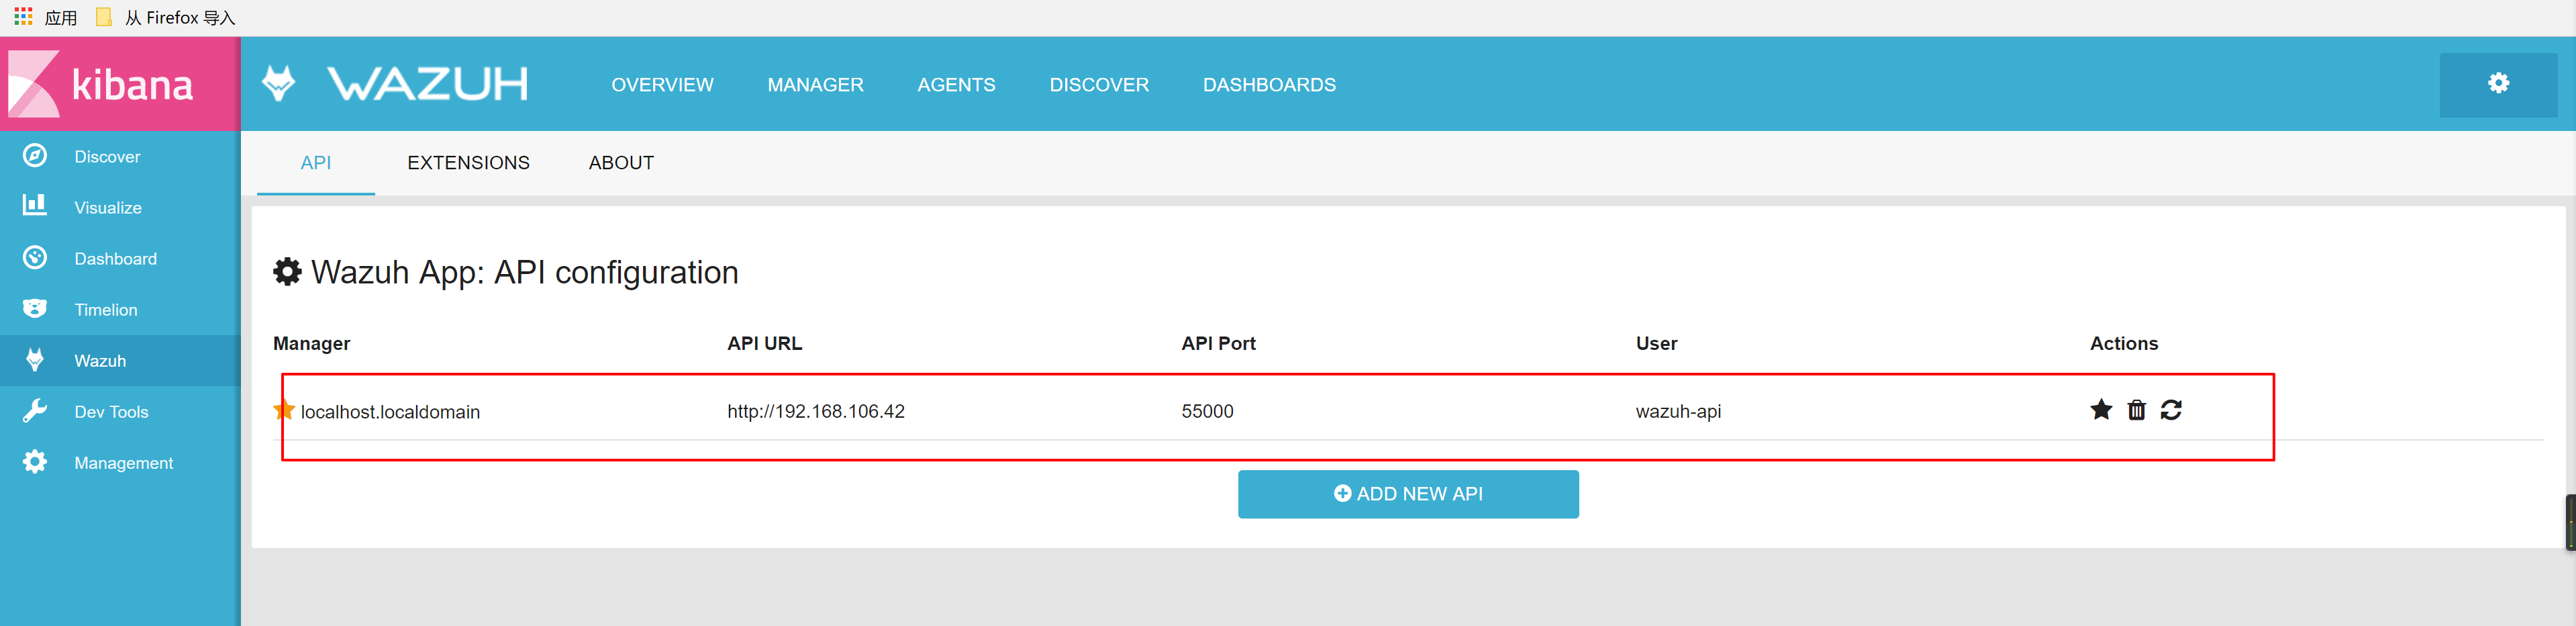
访问界面
点击”Wazuh”按钮
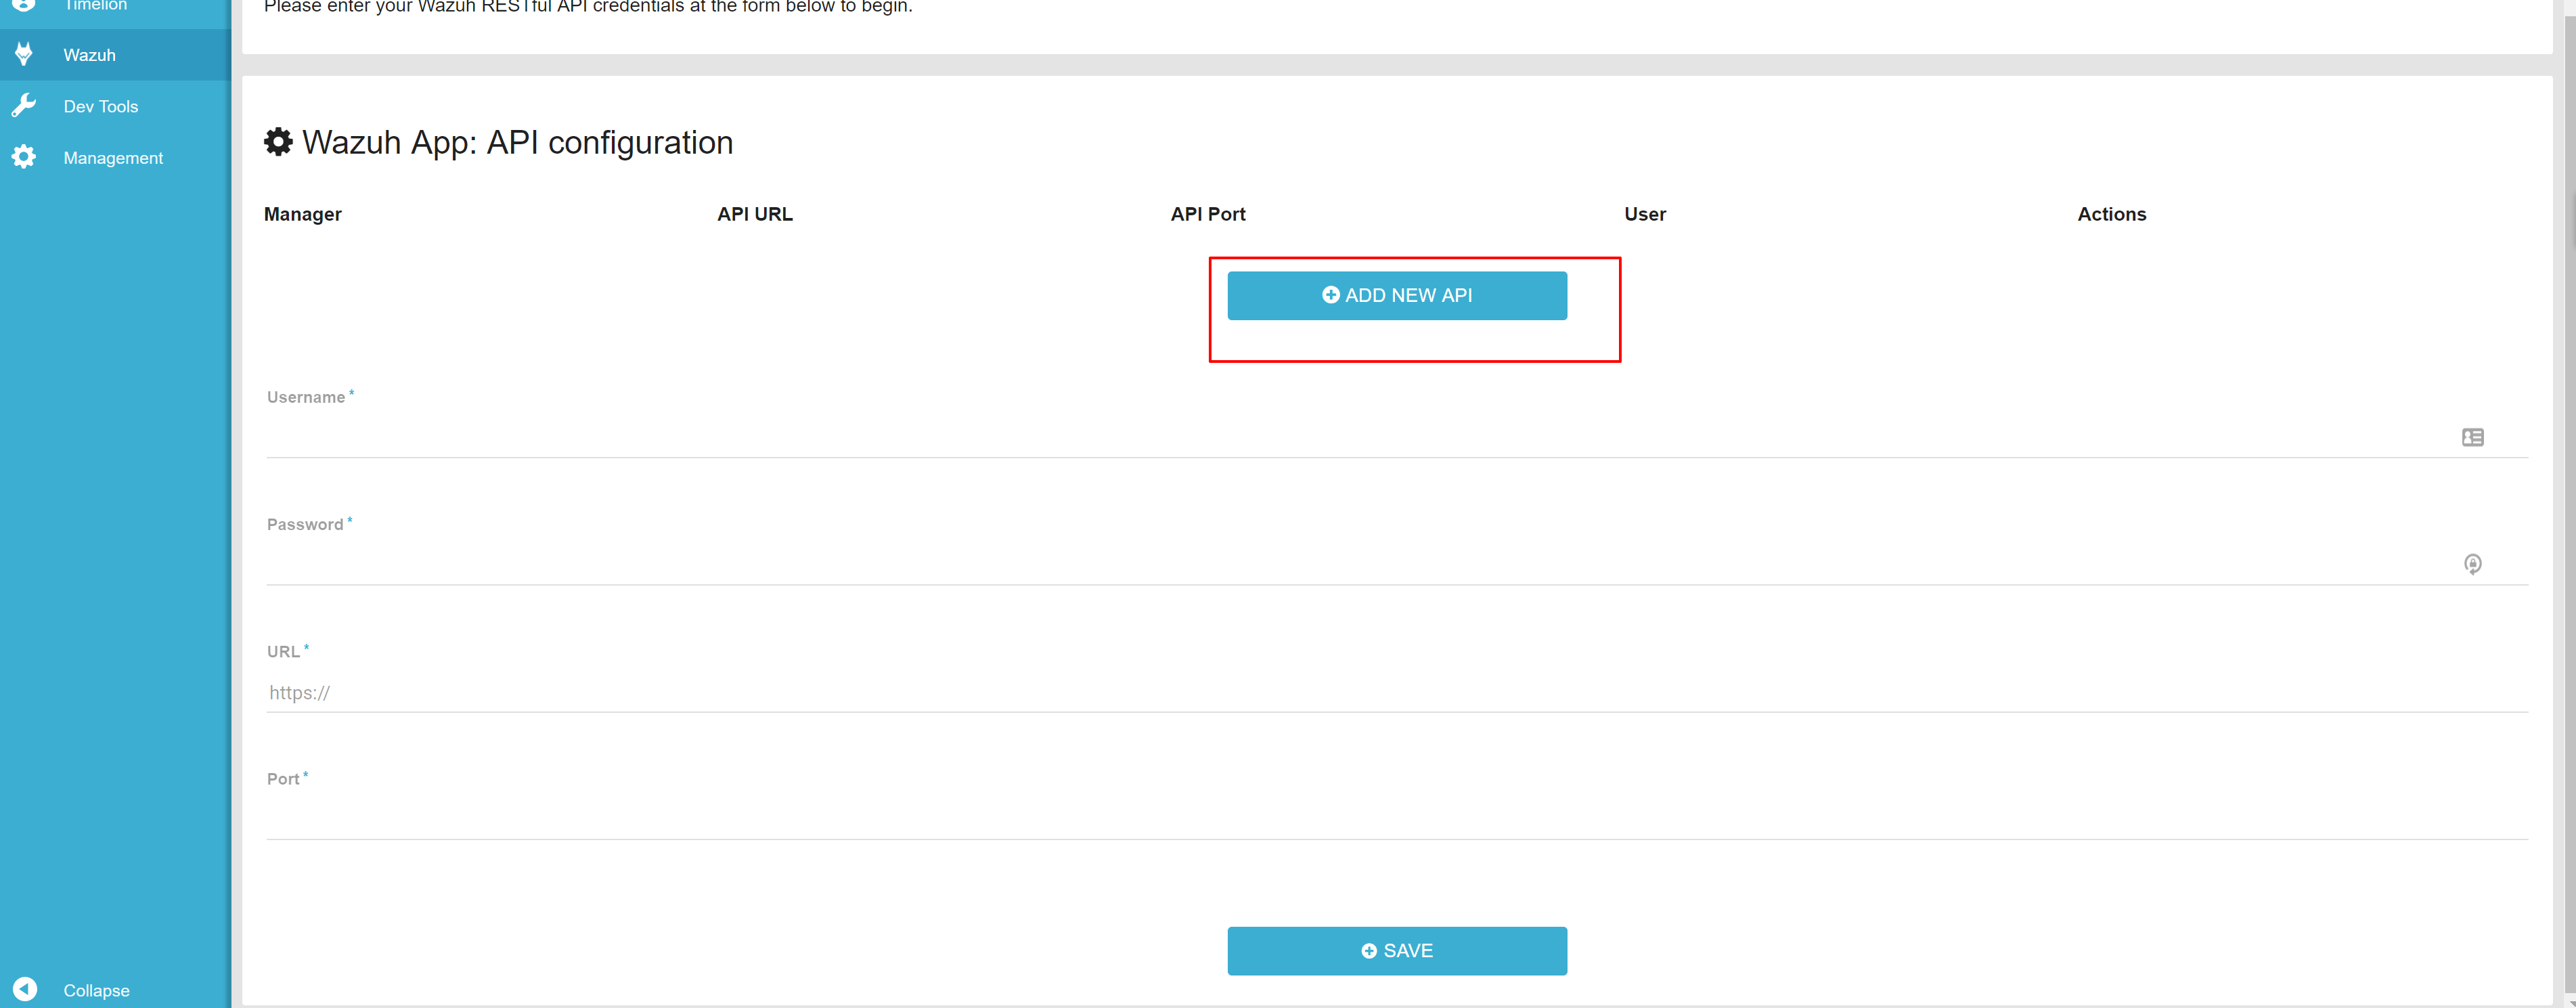
点击”ADD NEW API”
1 2 3 4 5 6 7 8 9 10 11 12 13 14 Welcome to the Wazuh App for Kibana 5 The Wazuh App brings together a new and useful web interface for managing and monitoring your Wazuh infrastructure. You can check agent status, alert evolution, most recent events, popular alerts, top alert groups, etc. You can also display configuration and logs of the manager. In addition, make use of any or all of these extensions: Linux Audit system integration. PCI DSS Compliance. OpenSCAP security compliance and vulnerability assessments. The app joins Wazuh features like: Log management and analysis, file integrity monitoring, intrusion and anomaly detection and policy and compliance monitoring. Help us to improve this app. We would appreciate your feedback. Collaborate with us on the Mailing Lists and/or the Wazuh App Github repository Please enter your Wazuh RESTful API credentials at the form below to begin.
请看上面的介绍,Wazuh主要的功能特性和扩展。新版本在上方的导航将api、扩展、关于分3个页面。
在填用户名、密码、url、端口之前,要先到Wazuh server主机上,使用命令生成非默认的认证来保护Wazuh API。
1 2 3 4 5 6 7 8 9 10 11 12 13 14 [root@localhost ~]# cd /var/ossec/api/configuration/auth/ [root@localhost auth]# ls htpasswd user [root@localhost auth]# sudo node htpasswd -c user wazuh-api New password: Re-type new password: Adding password for user wazuh-api. [root@localhost auth]# ll 总用量 4 lrwxrwxrwx. 1 root root 49 8月 1 15:12 htpasswd -> /var/ossec/api/node_modules/htpasswd/bin/htpasswd -rwxr-x---. 1 root root 48 8月 23 17:47 user [root@localhost auth]# service wazuh-api restart WAZUH-API stopped. WAZUH-API started.
可以先访问一下web,看认证是否成功
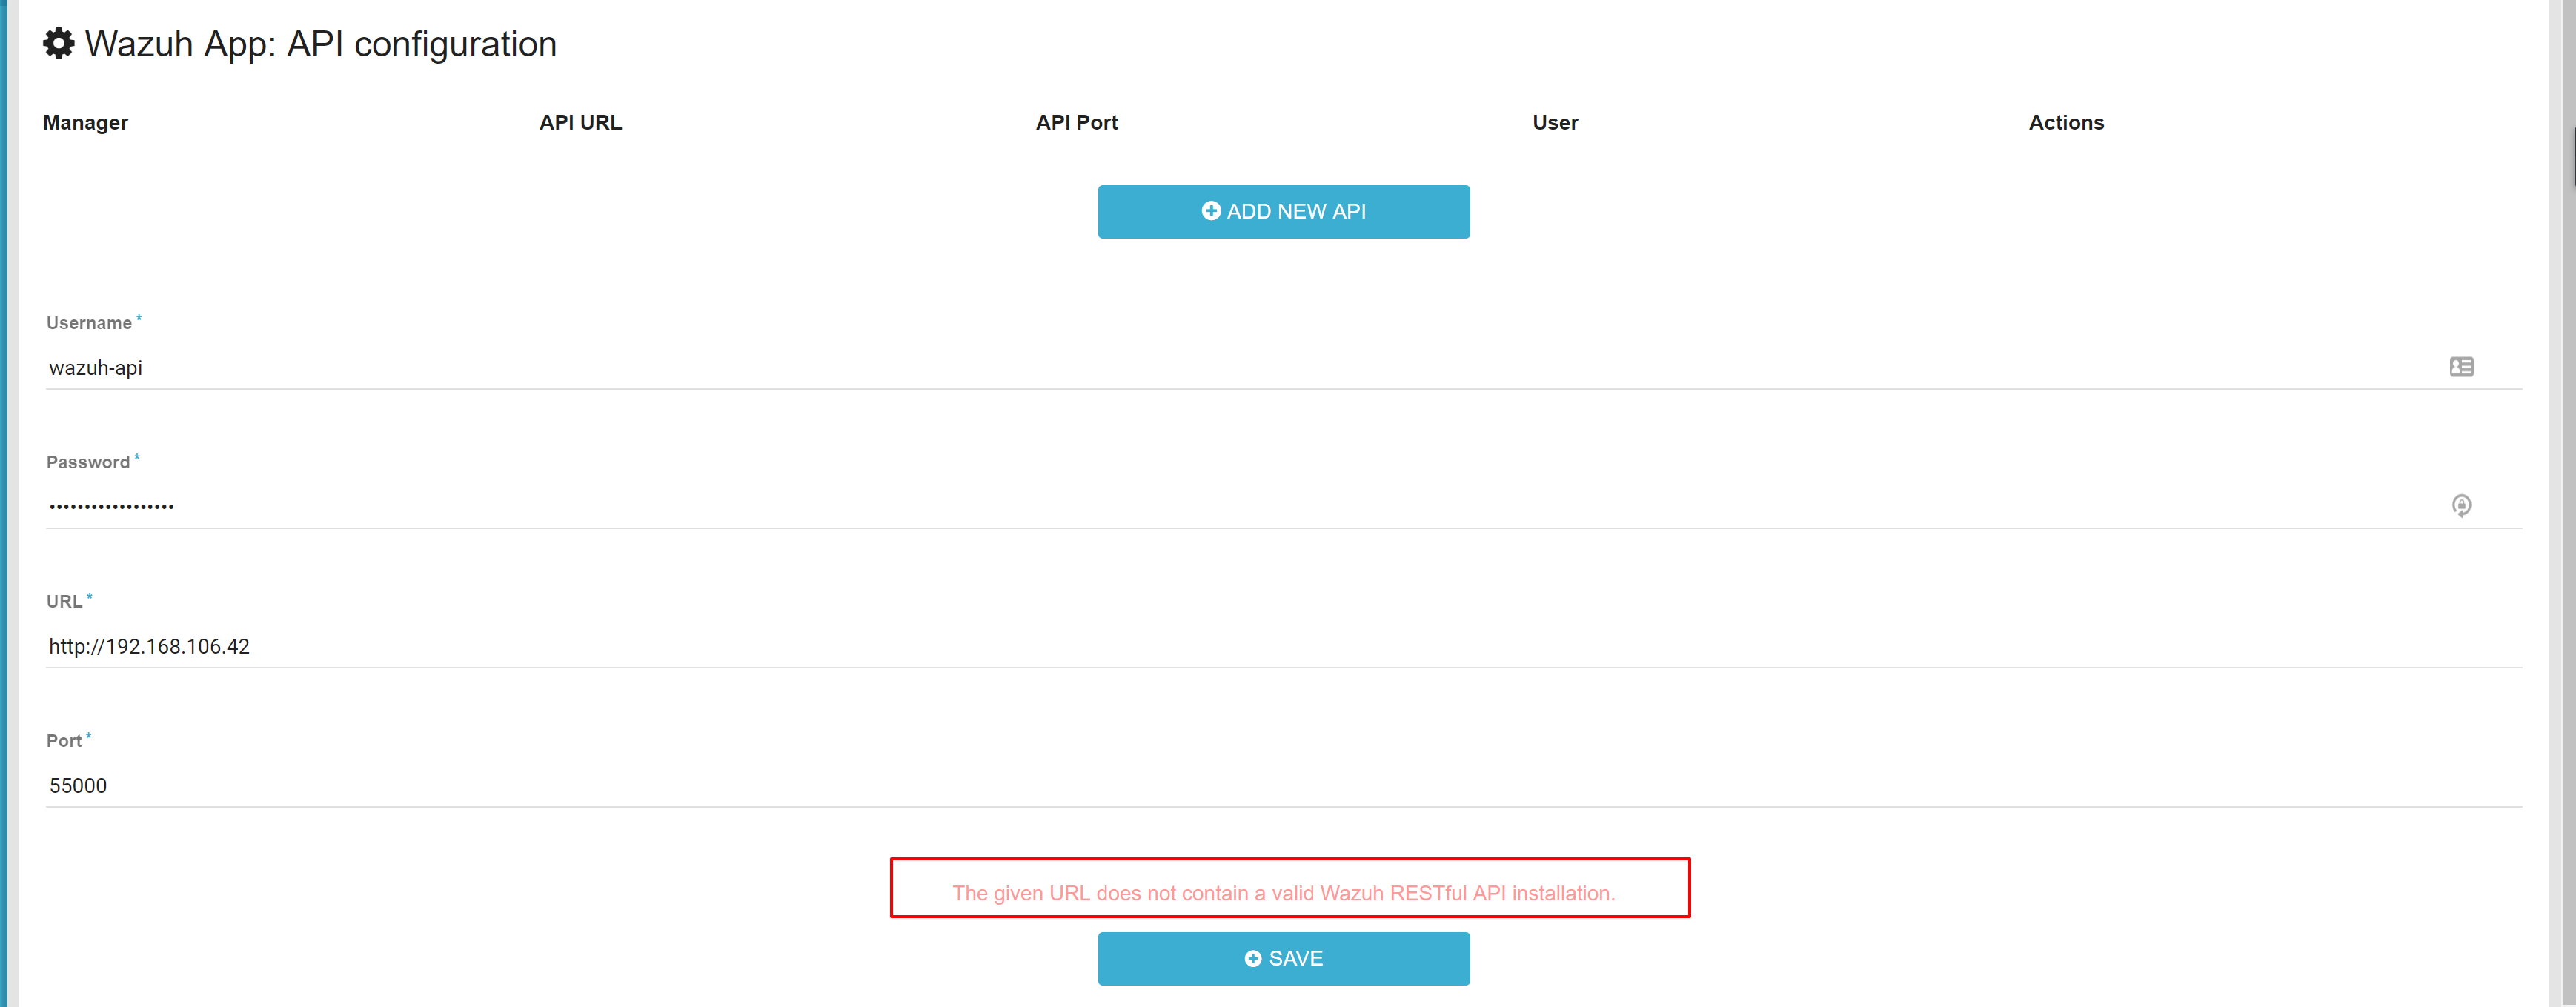
填入api字段-提示错误
官方的邮件列表解释了这个bug:https://groups.google.com/forum/#!msg/wazuh/kBVoD-X7xX4/vpDOHjKhCQAJ
1 2 yum upgrade wazuh-manager yum upgrade wazuh-api
官方列表里的讨论在版本比对时逻辑有错误等,在新版本中修复,升级就可以了。
安装agent 这个就很简单了:https://documentation.wazuh.com/current/installation-guide/installing-wazuh-agent/index.html
注册agent Manager的server端
1 2 3 4 5 6 [root@localhost db]# openssl req -x509 -batch -nodes -days 365 -newkey rsa:2048 -keyout /var/ossec/etc/sslmanager.key -out /var/ossec/etc/sslmanager.cert Generating a 2048 bit RSA private key ...............................+++ .........+++ writing new private key to '/var/ossec/etc/sslmanager.key' -----
1 2 3 4 5 6 7 8 [root@localhost db]# /var/ossec/bin/ agent_control ossec-analysisd ossec-execd ossec-luac ossec-remoted syscheck_update clear_stats ossec-authd ossec-integratord ossec-maild ossec-reportd update_ruleset.py list_agents ossec-control ossec-logcollector ossec-makelists ossec-syscheckd util.sh manage_agents ossec-csyslogd ossec-logtest ossec-monitord rootcheck_control verify-agent-conf ossec-agentlessd ossec-dbd ossec-lua ossec-regex syscheck_control wazuh-modulesd [root@localhost db]# /var/ossec/bin/ossec-authd [root@localhost db]#
agent-auth客户端
1 2 3 4 5 6 7 8 9 [root@localhost ~]# /var/ossec/bin/agent-auth -m 192.168.106.42 2017/08/28 14:54:58 agent-auth: INFO: Started (pid: 6235). WARN: No authentication password provided. INFO: Connected to 192.168.106.42:1515 INFO: Using agent name as: localhost.localdomain INFO: Send request to manager. Waiting for reply. INFO: Received response with agent key INFO: Valid key created. Finished. INFO: Connection closed.
查看是否成功
1 2 3 [root@localhost db]# cat /var/ossec/etc/client.keys 001 localhost.localdomain any 5e7168616c858ef0d9a8c1737359825e72c17bf3a9575ed9f696e4b30masaike [root@localhost db]# /var/ossec/bin/agent_control -l
1 2 [root@localhost ~]# cat /var/ossec/etc/client.keys 001 localhost.localdomain any 5e7168616c858ef0d9a8c1737359825e72c17bf3a9575ed9f696e4b30masaike
连接到服务端Manager
/var/ossec/etc/ossec.conf
1 2 3 4 5 6 7 8 9 10 11 12 13 14 把 <ossec_config> <client> <server-ip>MANAGER_IP</server-ip> <config-profile>centos, centos6</config-profile> <protocol>udp</protocol> </client> 改成 <ossec_config> <client> <server-ip>192.168.106.42</server-ip> <config-profile>centos, centos6</config-profile> <protocol>udp</protocol> </client>
1 2 3 [root@localhost ~]# service wazuh-agent start Starting OSSEC: 2017/08/28 15:19:09 ossec-agentd: INFO: Using notify time: 600 and max time to reconnect: 1800 [ OK ]
但是你会看到wazuh面板agents管理上,显示的连接过来的机器ip写的是any。因为
原文作者: pirogue
原文链接: http://pirogue.org/2017/08/24/WAZUH/
版权声明: 转载请注明出处(必须保留作者署名及链接)